Wiki
Understand the tool and use it properly
Wiki / Guide
Wiki
What is this tool? → Pitfalls & good practices
Understand the tool and use it properly
What is this tool?
CarX Street Build Optimizer computes a complete setup for YOUR car in CarX Street: gear ratios, differential, suspension, dampers, anti-roll bars, alignment and brakes. You enter your car's data (including a screenshot of its dyno), the tool outputs values ready to copy as-is into the game's tuning menu.
Without a tool, tuning a gearbox after an engine swap means an hour of trial and error. Here, analyzing your torque curve places every shift inside the engine's powerband, and the whole chassis is computed consistently, in 2 minutes.
Philosophy: the tool doesn't replace your driving. It gives you a mathematically balanced baseline that's already ~90% right. The last few % (your style, your spot) are yours to fine-tune in game, and you can edit your build anytime.
Create a build in 5 steps
A build is created with the 5-step form. Every step has a « ? » help bubble on each field, plus a 'Where to find these values in game?' block with actual game screenshots.
build name, car, discipline (see below) and drivetrain.
rev limiter, power, torque stats, turbo pressure, then upload the dyno screenshot. This is the key step, the analysis is mandatory.
Managing your builds
"My Builds" (/builds) is your garage: every setup you've saved, at a glance.
Search bar: live filter by build or car name.
Discipline chips (Grip, Track, Drift, Touge, Gymkhana, Drag) to show only one style at a time.
Your builds' history
Every change to a build is saved automatically. Nothing is ever lost.
"History" button on a build's page: every past version, most recent first.
Compare any two versions: a table shows only the fields that changed, before → after.
Your Garage: rank & badges
A profile page (your avatar, top of the sidebar) tracks your progress as a tuner.
A rank that climbs with your real activity (builds created, versions iterated, dyno analyses, builds shared, feedback sent), from Garage Rookie to Circuit Legend.
9 badges to unlock: first build, 5 versions on one build, Vmax within 1 km/h, 10 dyno analyses, a build cloned by another player, 100 views on a public build, a feedback that got a reply, 4 different disciplines, 30 days as a member.
The community
Any build can be made public ("Share" button on its page): it becomes visible on a dedicated page and in the "Community" gallery (/community).
The gallery can be filtered by discipline, power class (C1 to CS+), car or author, and sorted by date or popularity.
Sharing lets you declare the parts actually installed in-game (parts sheet), shown on your build's public page.
The dyno analysis
The dyno analysis reads your screenshot with computer vision: it isolates the blue curve (torque) and the white one (power), detects the orange cursor (rev limiter) and derives peaks and powerband. For a reliable read:
PC/console: capture the WHOLE dyno screen, with the orange cursor visible. Mobile: crop to keep ONLY the chart (no stat panels around it).
Required: a real screenshot, sharp, NEVER a photo taken with a phone or another device. The analysis won't work otherwise.
Disciplines
The discipline is the #1 input of the whole calculation: it sets the gearbox's useful speed range and every chassis preset. Pick the one matching YOUR usage:
Mountain roads, chained tight corners (calibrated and validated in game).
Grip racing, fast streets.
What the tool computes (and how)
No value is an arbitrary lookup table: every module is a physical model, calibrated on setups validated in game.
Your target top speed is reached at the rev limiter in last gear. 2nd gear is the 'corner gear': at your corner exit speed, the engine lands right at the bottom of the powerband read from the dyno. Intermediate gears follow a geometric progression. If the range is too wide for the gear count, a warning tells you. In Drag, this method doesn't apply: the gearbox is staged by simulating acceleration over the exact distance of the race you picked (no corner exit speed to enter).
Physical model: lock transfers to the outside wheel only the torque the unloaded inside wheel can no longer handle. More torque, higher center of mass, narrower tires → more lock. In drift, the model is replaced by a locked diff (you WANT to slide).
Reading the results page
A build page shows the 4 COPY-ME sections first, in the game's tuning menu order: Transmission, Differential, Suspension, Alignment & brakes. Copy the values as-is, section by section.
The gradient bars visualize gearbox spacing and locks. No need to interpret them, only the values matter.
'Calculation details & input data' (collapsed): theoretical top speed, drop rpm, powerband, top speed per gear and everything you entered.
Pitfalls & good practices
Units are in parentheses on every field: tracks and wheelbase in METERS (1.48, not 1480), weight in kg, center of mass in INCHES.
Turbo: don't correct torque yourself. Enter the game stats as-is plus the boost pressure, the tool does the conversion.
A blurry or cropped dyno screenshot = cascading wrong values (powerband → gearbox → diff). Always check the displayed peaks after the analysis.
FAQ
Does it replace my driver feeling?
Where do the formulas come from?
Why does my differential output low values?
What is this tool?
CarX Street Build Optimizer computes a complete setup for YOUR car in CarX Street: gear ratios, differential, suspension, dampers, anti-roll bars, alignment and brakes. You enter your car's data (including a screenshot of its dyno), the tool outputs values ready to copy as-is into the game's tuning menu.
Without a tool, tuning a gearbox after an engine swap means an hour of trial and error. Here, analyzing your torque curve places every shift inside the engine's powerband, and the whole chassis is computed consistently, in 2 minutes.
Philosophy: the tool doesn't replace your driving. It gives you a mathematically balanced baseline that's already ~90% right. The last few % (your style, your spot) are yours to fine-tune in game, and you can edit your build anytime.
Create a build in 5 steps
A build is created with the 5-step form. Every step has a « ? » help bubble on each field, plus a 'Where to find these values in game?' block with actual game screenshots.
- 1 Identity : build name, car, discipline (see below) and drivetrain.
- 2 Engine & Dyno : rev limiter, power, torque stats, turbo pressure, then upload the dyno screenshot. This is the key step, the analysis is mandatory.
- 3 Transmission : stock gearbox (final drive, last gear), corner exit speed and target top speed of your discipline.
- 4 Chassis : weight, balance, wheelbase, track widths, center of mass height. Wheelbase and tracks are found on the internet (real model's spec sheet).
- 5 Tires : front/rear size and grip, read directly from the tires in game (e.g. 285/30 R17).
At the end, the build is saved and you land straight on the results page. Limit: 10 builds per account.
Managing your builds
"My Builds" (/builds) is your garage: every setup you've saved, at a glance.
- Search bar: live filter by build or car name.
- Discipline chips (Grip, Track, Drift, Touge, Gymkhana, Drag) to show only one style at a time.
- Sort by creation date, name, power or weight.
- Each card lets you view the full tuning or edit the build directly.
Limit: 10 builds per account. Delete or edit an old build instead of creating a new one.
Your builds' history
Every change to a build is saved automatically. Nothing is ever lost.
- "History" button on a build's page: every past version, most recent first.
- Compare any two versions: a table shows only the fields that changed, before → after.
- Handy after a big tuning session to pinpoint exactly what made the difference.
Your Garage: rank & badges
A profile page (your avatar, top of the sidebar) tracks your progress as a tuner.
- A rank that climbs with your real activity (builds created, versions iterated, dyno analyses, builds shared, feedback sent), from Garage Rookie to Circuit Legend.
- 9 badges to unlock: first build, 5 versions on one build, Vmax within 1 km/h, 10 dyno analyses, a build cloned by another player, 100 views on a public build, a feedback that got a reply, 4 different disciplines, 30 days as a member.
- A popup lets you know the moment you unlock a badge.
The community
Any build can be made public ("Share" button on its page): it becomes visible on a dedicated page and in the "Community" gallery (/community).
- The gallery can be filtered by discipline, power class (C1 to CS+), car or author, and sorted by date or popularity.
- Sharing lets you declare the parts actually installed in-game (parts sheet), shown on your build's public page.
- "Use as a base" button on another player's public build: clones it directly into your garage to adapt to your car.
- The parts sheet now offers any engine or gearbox in the game, not only the swaps the game lists for your car. This matches what's actually possible in-game.
The dyno analysis
The dyno analysis reads your screenshot with computer vision: it isolates the blue curve (torque) and the white one (power), detects the orange cursor (rev limiter) and derives peaks and powerband. For a reliable read:
- PC/console: capture the WHOLE dyno screen, with the orange cursor visible. Mobile: crop to keep ONLY the chart (no stat panels around it).
- Required: a real screenshot, sharp, NEVER a photo taken with a phone or another device. The analysis won't work otherwise.
- Both curves must be readable (blue = torque Nm, white = power).
- After the analysis, check the displayed peaks match the chart before moving on.
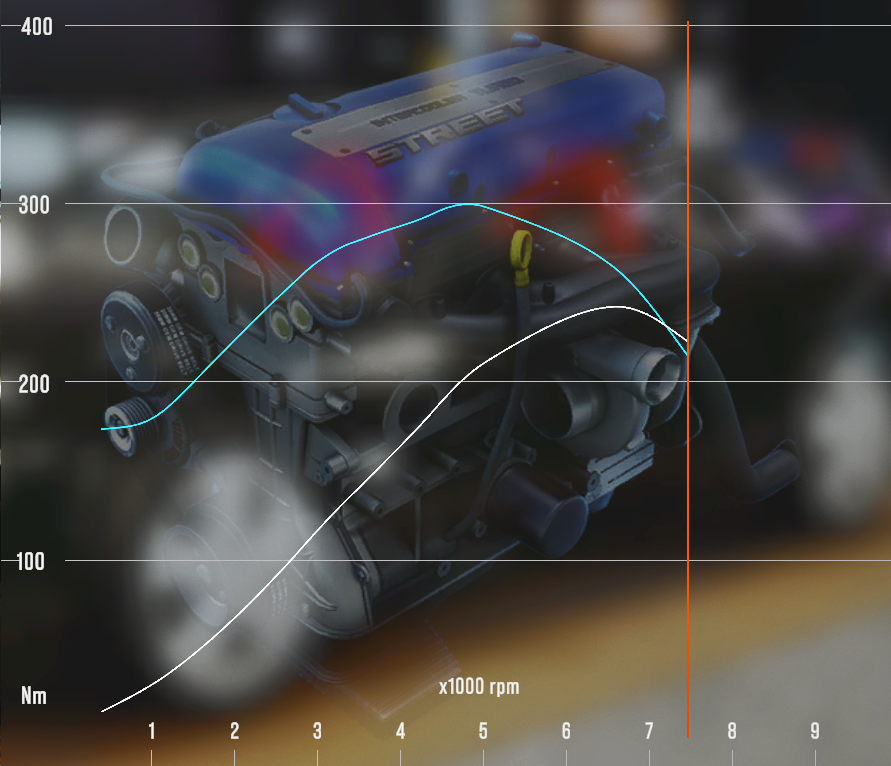
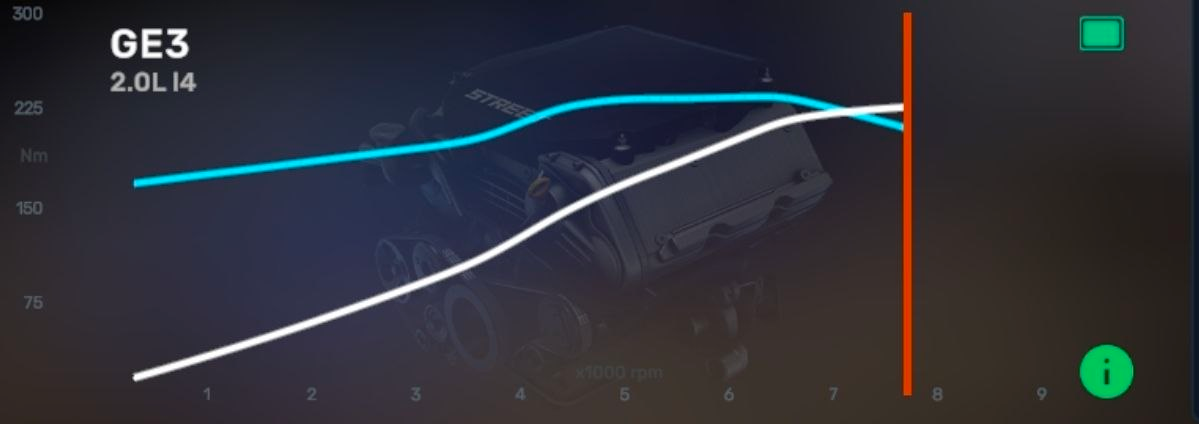
Turbo engine? Enter the boost (bar) in the engine step: in-game torque stats EXCLUDE boost, the tool corrects automatically (e.g. 197 Nm shown @ 0.6 bar ≈ 300 Nm real).
Disciplines
The discipline is the #1 input of the whole calculation: it sets the gearbox's useful speed range and every chassis preset. Pick the one matching YOUR usage:
| Style | Usage | What it changes |
|---|---|---|
| Touge | Mountain roads, chained tight corners (calibrated and validated in game). | Medium suspension, short gearbox anchored on hairpins, responsive diff. |
| Grip | Grip racing, fast streets. | Stiffer than touge, flatter body. |
| Track | Fast circuit, long high-speed corners. | The stiffest and flattest setup, stable steering, forward brake bias. |
| Gymkhana | Very slow technical courses, hairpins, handbrake. | Soft bars and high Ackermann to pivot, rearward brake bias, big steering angle. |
| Drift | Sliding, angle, style. | Locked diff (0.9/0.9), stiff front / soft rear, caster and angle maxed, rear toe-in for traction, 100% front braking. |
| Drag | Pure straight line, standing start over the exact distance of the race you picked in-game. | Gearbox staged by acceleration simulation over that distance (not vMin/vMax like other disciplines), locked accel diff for launch traction. |
What the tool computes (and how)
No value is an arbitrary lookup table: every module is a physical model, calibrated on setups validated in game.
Gearbox
Your target top speed is reached at the rev limiter in last gear. 2nd gear is the 'corner gear': at your corner exit speed, the engine lands right at the bottom of the powerband read from the dyno. Intermediate gears follow a geometric progression. If the range is too wide for the gear count, a warning tells you. In Drag, this method doesn't apply: the gearbox is staged by simulating acceleration over the exact distance of the race you picked (no corner exit speed to enter).
Differential
Physical model: lock transfers to the outside wheel only the torque the unloaded inside wheel can no longer handle. More torque, higher center of mass, narrower tires → more lock. In drift, the model is replaced by a locked diff (you WANT to slide).
Suspension, dampers, ARBs
Stiffness derived from the discipline's target ride frequencies (k = 4π²f²m on the SPRUNG mass, wheels subtracted), dampers at ζ = 0.7 of critical damping split per phase (bump ×2/3, fast bump ×1/3, rebound ×3/2, fast rebound ×3/4), anti-roll bars via the desired-roll-rate method including tire compliance, split by front mass. This is the reference community calculator's system.
Alignment & brakes
Caster, steering angle, Ackermann, camber and toe adapted to the discipline and drivetrain. Brake bias = weight distribution + load transfer under maximum braking (and 100% front in drift).
Reading the results page
A build page shows the 4 COPY-ME sections first, in the game's tuning menu order: Transmission, Differential, Suspension, Alignment & brakes. Copy the values as-is, section by section.
- The gradient bars visualize gearbox spacing and locks. No need to interpret them, only the values matter.
- 'Calculation details & input data' (collapsed): theoretical top speed, drop rpm, powerband, top speed per gear and everything you entered.
- 'Dyno charts' (collapsed): your extracted curve + wheel torque per gear, with the powerband highlighted.
An orange ⚠ at the top flags a compromise (e.g. speed range too wide for the gear count): read it, it tells you what to change.
Pitfalls & good practices
- ⚠ Units are in parentheses on every field: tracks and wheelbase in METERS (1.48, not 1480), weight in kg, center of mass in INCHES.
- ⚠ Turbo: don't correct torque yourself. Enter the game stats as-is plus the boost pressure, the tool does the conversion.
- ⚠ A blurry or cropped dyno screenshot = cascading wrong values (powerband → gearbox → diff). Always check the displayed peaks after the analysis.
- ⚠ After changing engine, turbo or tires, redo the dyno analysis and update the build. Setups are only valid for the data entered.
- ⚠ The tool is an early version. If a value feels off in game, send a feedback (bubble button bottom right) with the build name. The team can now reply directly, and you'll be notified by email and in the app.
- ⚠ Aero (not covered by the calculator yet): max out front downforce, run rear equal or one notch above front. Too much REAR downforce eats acceleration. It's a common, high-impact setting many players undertune.
- ⚠ Slow vs Fast dampers: SLOW governs chassis behavior under steering/braking/throttle (overall handling and balance), so tune it first. FAST governs wheel movement over curbs and bumps (grip and stability on rough surfaces). Soften it if the car unsettles on bumpy roads (touge) even if slow feels right.
FAQ
Does it replace my driver feeling?
No, and that's not the goal. The tool gives you a balanced baseline computed for YOUR car and YOUR discipline. You keep full control to fine-tune: it's the difference between starting from a blank page and starting from a coherent setup.
Where do the formulas come from?
Real vehicle dynamics (ride frequencies, roll moment, load transfer, inside-wheel capacity), calibrated on setups tested and validated in CarX Street. Track/gymkhana/drift presets additionally lean on setup literature (Suspension Secrets, SLRspeed, MotoIQ).
Why does my differential output low values?
Lock depends on real torque, grip and load transfer: a low-torque, high-grip car physically doesn't need much lock. If the diff outputs 0.9/0.9, you're in drift (intentionally locked diff).
How many builds can I create?
10 per account for now. Delete an existing build to create a new one, or edit an existing build (the edit form is identical).
A question not answered here? A doubt about a value? Use the feedback button (bubble bottom right). Every report improves the tool.
If the calculator saved you time, you can support its development and hosting costs:
☕ Support the project